Skill Level
Intermediate
Time to Make
1 hour
Adult Supervision Needed
Yes
How to Make
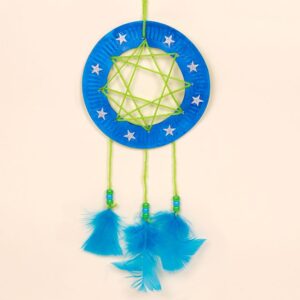
- Fold one of the small coloured paper plates in half and cut out the middle by cutting out a semi-circle along the dimpled edge of the plate.
- Unfold the plate to reveal a neat circle cut out of the middle of the plate.
- Punch 3 holes in a row at the bottom of the circle. This is where the feathers and beads will hang.
- Punch a hole at the top of the circle in line with the 3 punched holes below. This is where the dream catcher will be hung.
- Cut 3 pieces of coloured wool 15cm long. Tie each piece to each of the 3 punched holes at the bottom of the circle. Tie with a double knot and trim off the excess wool from the knot.
- Hole punch a few more holes around the rim of the circle.
- Tie a piece of different coloured wool roughly 12cm long to the top centre circle where the dream catch will be hung. Tie the wool into a loop and secure with a double knot. Trim off the excess wool from the knot.
- Using the same coloured wool as the 3 long strips at the bottom of the dream catcher, thread the wool through the holes around the edge of the dream catcher. Thread the wool sideways, upwards and diagonal to make a web-like appearance. Dont forget to still thread the wool through the bottom three holes and the hole at the top used for hanging the dream catcher so that the wool is spread evenly around the circle.
- Once you have finished making your web, cut the wool leaving enough at the end to tie it to a secure piece of wool in the web at the back of the dream catcher. Try to tie it behind the circle edge so that it cant be seen. Tie with a double knot.
- To stop the knot from untying, place a small amount of super tacky glue onto the knot and leave to dry.
- Thread a plastic needle through the end of one of the long pieces of at the bottom of the dream catcher and thread through 4 wooden painted flower beads. Repeat with the other 2 pieces of wool.
- Place a blob of super tacky glue into the hole of the bead at the bottom. Put 2 speckled feathers back to back inside the bottom bead attached to the glue. Leave the glue to dry for the feathers and beads to stay in place. Repeat with the other 2 pieces of wool. Leave to dry.
- Decorate around the edge of the dream catcher with Gold & Silver Glitter Star stickers and Self-Adhesive Acrylic Stars.


Top Tip
To prevent the wool from fraying, use plastic needles to thread the wool through the punched holes.
Tagged with:
Paper Plate