Skill Level
Easy. Adult supervision needed
Time to Make
45 Minutes plus drying time
Adult Supervision Needed
Yes
How to Make
- Firstly, make some clay slip by adding a little water to some soft clay and mix it with a fork.
- Tear off a piece of clay and roll it into long ‘sausage’ shapes, the width of your pinky finger.
- For the base of the coil pot, roll one of the ‘sausage’ shapes into a spiral.
- Then using a modelling tool, smooth out the top.
- Score and create texture around the edge of the circle base.
- Then paint some slip over where you scored the clay.
- Roll another coil and cut it to the right length. Do this by lining up the coil with the edge of the base, or on the coil below and trim the ends. You can cut the clay with a modelling tool.
- Once it’s cut to length, you need to bond the two ends of the coil together using the scoring and slip technique.
- Repeat the steps until the coil is to your desired height and set aside to dry. You can smooth the coils with a little bit of water and a paint brush as you go.
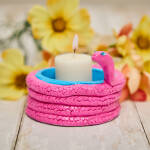
- When the clay coil pot is dry, paint with your desired colours.
- Lastly, varnish your pot to create a shiny finish.


Top Tip
A larger coil pot will require larger coils.