Skill Level
Medium - Hard
Time to Make
4 hours, drying time of 1-2 days
Adult Supervision Needed
Yes
How to Make
- Roll the clay into a 1cm thick slab, using a sharp tool draw 6cm circumference circle. Once you have your circle base, roll out a 1cm thick and roughly 4cm height rectangular slab to wrap around the circumference of your circle. Using a clay tool, blend the inside of the slab with the base to mesh both pieces of clay together.
- Next, roll a long 1cm thick sausage to fit the circumference of your pot.
- Using the cross hatching method, adhere the first part of the snake body to the pot.
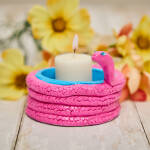
- Repeat this process until you’ve created a full snake body around the pot, then mould a snakes head using a separate piece of clay and connect this to the top part of the snakes body. Place a lump of clay underneath the snakes head to keep it upright until it dries.
- Allow the clay to part-dry for 2-3 hours. Once it’s hardened a little, take a small ‘C’ shaped tool to create scales. Then allow the bowl to dry for 1-2 days – it will turn white when fully dried.
- Paint the snake any colour you like! I went for pink snake with a blue tea light holder. I also added small blue jewels for the eyes. Finish your project with our brush-on varnish for glossy finish.


Top Tip
When coiling, its important to keep the clay at a medium wetness to avoid cracking
Tagged with:
Clay Modelling