Skill Level
Beginner
Time to Make
30 minutes per shape + baking time for Fimo
How to Make
Clay Soft colours can be kneaded together to make a variety of different shades. To mix a pale pink, knead 3 white strips with 1 pink strip until they are evenly blended. To make a pale orange, knead 2 yellow strips with 1/4 red strip.
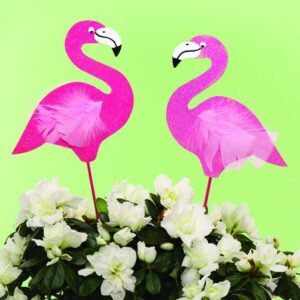
Flamingo
- Roll a 3cm ball of pink clay with your fingers to make it longer, keep rolling one end to make it thinner for the flamingo’s neck, leaving the other end thicker for the body, so the whole shape is about 7cm in length.
- Pinch the thick end into a tail then curl it down. Press tiny pieces of black and white clay together to form the beak, curl the neck round and press the beak onto the end, so it rests against the body. Shape a dark pink wing then press it onto the body. Press a tiny white eye onto the head then make a hole in the middle with a cocktails stick.
- Shape a 2cm blue clay ball into a semi-circle for the water. Shape 5 x 1cm green balls into longer strands for foliage then press these above the water to make a background.
- Place the flamingo onto the background with thin pink legs and white ripples on the water. Press the pieces gently together without distorting them.
Watermelon
- Shape 1 pink clay strip into a ball, press it into a circle with your fingers then press one side onto your work surface to flatten the edge into a semi-circle, about 3cm in diameter.
- Roll a thin strand of white clay and carefully press it around the curved edge of the pink semi-circle. Roll a slightly thicker strand of green clay and press it next to the white, for the edge of the melon. Use a modelling tool to trim and shape the edges so they look neat.
- Press tiny black clay pips onto the melon, or draw these with a permanent pen once the clay has been baked and cooled. Use a cocktail stick to carefully make a hole near one end of the melon.
Pineapple
- Flatten a 2cm clay pale orange clay ball into an oval. Press the sides to make them flatter then use a modelling tool or a strip of card to press diagonal lines into the surface to make a pattern onto the pineapple.
- Shape some small green pieces into leaves then press onto the top of the pineapple. Keep the leaves chunky and not too thin, so a hole can be made through the top.
- When the clay pineapple has been hardened and cooled, brush with a darker orange or brown paint to highlight the pattern then wipe away any excess paint.
Tropical Flower
- Shape 1/3 clay strip into a ball using a bright colour, then press it with your fingers to make a 2cm flat circle. Roll 5 tiny thin white strands (or use a contrasting colour) and arrange them in the centre of the circle to form a star shape. Flatten the clay with a rolling pin so the star spreads out.
- Use a modelling tool to make 5 small cuts into the edges of the circle, using the shape in the middle as a guide for making the petals. Press the sides of the petals with a modelling tool to form simple curved shapes. Use the modelling tool or a small strip of card to press a lined pattern onto the petals.
- Press a small clay ball in the centre of the flower then press down with the end of a thin brush or a pointed modelling tool to make a shallow hole. Make another flower in the same way, using a different colour.
- Flatten a green clay ball into a 4cm diameter circle for a background. Shape some small green leaves, press the ends onto the circle and curl them round. Press the flowers on top.
Bake clay models on a baking tray or tile in a pre-heated oven for 30 minutes at 110oC, following the instructions on the packet. Allow clay to cool before handling.
Attach clay shapes onto a key ring with jump rings or thin ribbon. To add a badge pin onto the back, use strong glue to make sure it is securely fixed.


Top Tip
Keep your fingers clean with wet wipes so any darker colours don’t transfer on to the lighter ones as you are working.