Skill Level
Beginner. Adult supervision needed
Time to Make
1 hour 30 minutes
Adult Supervision Needed
Yes
How to Make
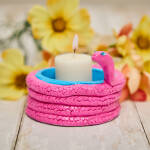
- Decide how many beads you’d like to make, then roll out equal-sized balls and put to one side. Leave to dry for approximately half an hour. Pour one shade of glitter into a bowl. Pour PVA glue into another bowl. Push one of the beads onto a skewer gently and move it back and forth a couple of times to smooth out the hole.
- With the bead still on the skewer, dip it first into the glue, rolling it around to fully coat it, then into the glitter, ensuring the surface is completely covered. Leave it on the skewer; to make it easier for it to dry without smudging any of the sides, take a spare block of clay and push the other end of the skewer in it to keep it upright. Or you could place it in an empty jam jar or other container.
- Repeat with different shades of glitter for the rest of your beads. When they are dry, add a coat of varnish to each one to further seal the glitter. Finally, feed them onto elastic or beading thread to finish.


Top Tip
For a two-tone look, sprinkle one shade of glitter directly onto your glued bead, followed immediately by the second.