
Skill Level
Intermediate
Time to Make
1 hour per jar
How to Make
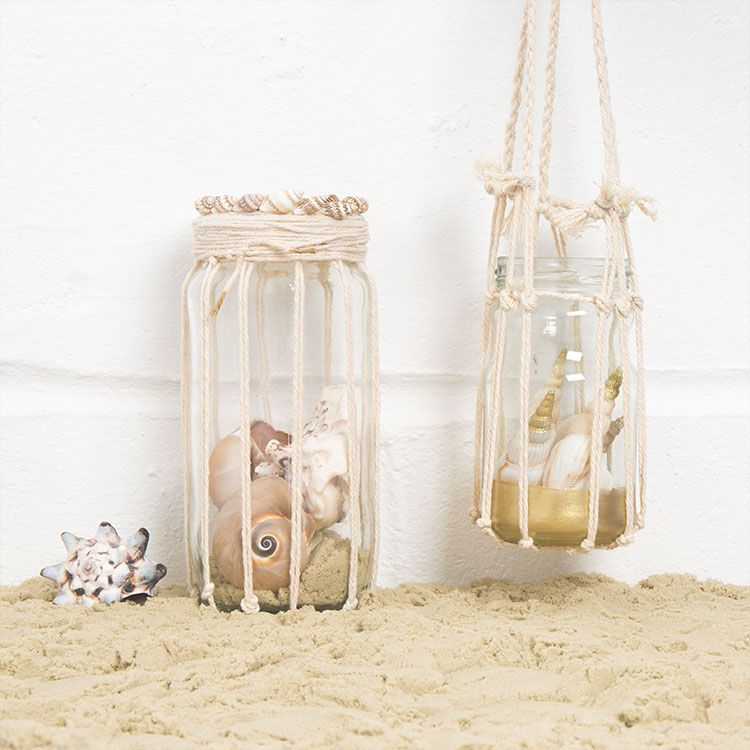
- Large Jar
- Using the cotton string tie a loop very slightly smaller than the base of your jar. Cut 10 pieces of string that are over double the length of your jar. Loop each string, one at a time around the small base loop you created (so the long string is folded in half) and then tie a double knot in it about 1 cm from the centre point. See the picture for guidance. Once finished, space these out around the loop (almost like a clock face or spiders web).
- Place the jar on top. Tie another loop around the top of the jar, fix loosely for now so that you have space to attach the vertical strings. One at a time pull the strings up vertically along the side of the jar, feed under to top loop and knot in place. Continue with all stands, adjusting placement as and when necessary. Once all are in place, re-knot the top loop more securely. Cut the ends of the strings at the top and glue gun to the rim of the jar.
- Using a glue gun and the roll of string, cover the top of the jar entirely with string (this will cover the ends you’ve secured in place.
- Finish by painting the inside rim with gold metallic acrylic, and glue gun a delicate line of mini craft shells around the top. Lastly paint a little bit of the ends of the tie around the top with gold. Fill with large shells if desired.
- Small Hanging Jar
- Coat the bottom few cms of the jar in gold metallic paint and allow to dry thoroughly.
- Using the cotton string tie a loop very slightly smaller than the base of your jar.
- Cut 10 pieces of string that are triple the length of your jar.
- Loop each string, one at a time around the small base loop you created (so the long string is folded in half) and then tie a double knot in it about 1 cm from the centre point. See the picture for guidance. Once finished, space these out around the loop (almost like a clock face or spiders web).
- Place the jar on top. Tie another loop around the top of the jar, fix loosely for now so that you have space to attach the vertical strings.
- One at a time pull the strings up vertically along the side of the jar, feed under to top loop and knot in place. Continue with all stands, adjusting placement as and when necessary. Once all are in place, re-knot the top loop more securely. Keep the end of the strings long.
- Take two pairs of strings next to each other (4 single strings) and double knot together about 3cms up. Continue around the jar, so you have 5 pairs knotted together. Cut all of the ends to about 1 cm length.
- Create 5 plaited lengths of strings of equal length all double knotted at both ends. Take one plait, feed through the top of the tied pair, make a small hole in the top of of the plait (near the knot) feed the other end of the plait through and pull taught. This should secure the plait and tied pair together.
- Do this for all plaits. Finally gather all 5 plaited strands and tie together simply with one string. It is now ready to hang! Fill with pretty shells or a battery operated tea light. We painted the tips of the shells with gold metallic paint for that extra special touch.


Top Tip
Cut the strings longer than you think you'll need them as you can always trim them rather than find your string is too short and have to start again!